
Alchemy Help:
Project Preferences
[Contents]
[Index]
[Project]
[Home page]
[FTP]
[Telnet]
[CGI-BIN]
[Project upload]

Configuring a project
The Project dialog box is used to create new Alchemy
projects and to change the settings of existing projects. The dialog is
accessed from the Alchemy Project window.
- To change the settings of an existing project, press the Change
project preferences button on the toolbar or select the
Options/Project preferences... menu item.
- To create a new project from scratch press the Create a new project
file button on the toolbar or select the File/New project...
menu item.
- To import the contents of a directory as a new project, select the
File/Import directory as new project file... menu item.
The Project dialog is used to configure items such as the project name and the
location of your web server. The list box on the left side of the dialog
displays the various project items that can be configured. When you select
an item from the list, the contents of the configuration pane on the right
side of the dialog will change to display the current settings for the area
that you have selected. Following is a description of each of the areas that
you can set up.
Project
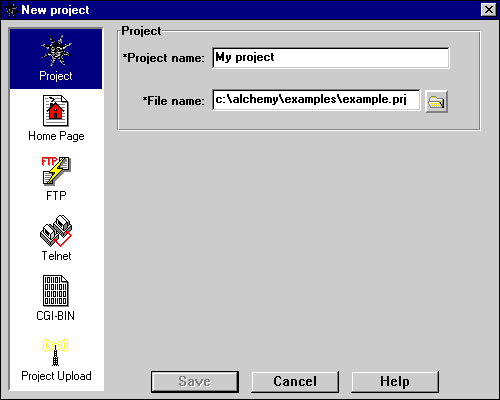
- When editing an existing project:
- Project name: This is the name that is associated with the
project folder (the first folder in the Project window). You can call the
project anything you want, like "My web site". This is a required field.
- When creating a new project from scratch:
- Project name: This is the name that is associated with the
project folder (the first folder in the Project window). You can call the
project anything you want, like "My web site". This is a required field.
- File name: This is the full path name of the new project file, as
in "c:\mydir\mysite.prj". Alchemy project files should end with a .prj
extension so that Alchemy can find them. This is a required field.
- When importing a directory as a new project:
- Project name: This is the name that is associated with the
project folder (the first folder in the Project window). You can call the
project anything you want, like "My web site". This is a required field.
- File name: This is the full path name of the new project file, as
in "c:\mydir\mysite.prj". Alchemy project files should end with a .prj
extension so that Alchemy can find them. This is a required field.
- Directory: This is the full path to the directory which contains
the HTML files you want to import, as it "c:\mydir". This is a required field.
Home page

This section lets you specify the name of the HTML file which contains your
home page and it's location on the server.
- URL: Your home page's URL, as in "http://www.mysite.com". This is a
required field.
- Server home directory: The host directory in which your home page is
stored, as in "/pub/myco". This is a required field.
- File name on server: As in "index.html". This is a required field.
- Local file name: As in "index.htm". This is a required field.
Note: Since Unix file naming conventions differ from those of DOS,
Alchemy allows you to specify host and local versions of the home page
name. When Alchemy uploads the file to the host, it will automatically
copy it to a file with the host name.
FTP
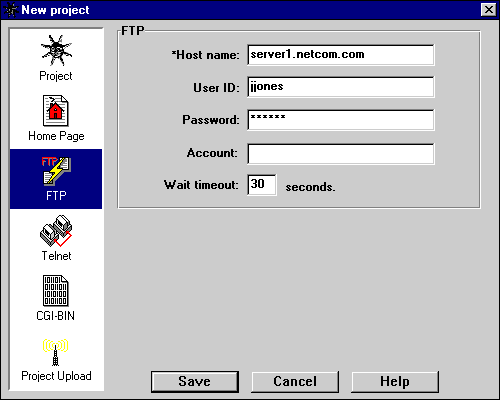
This section lets you configure the internet File Transfer Protocol
settings which Alchemy will use to upload your projects to your web server
(a.k.a. your host). When you start a new project, these settings
are copied into the new project file from the
default settings. When you
select the Project/Upload project to server... menu item or press
the Upload toolbar button in the Project window, Alchemy uses
these settings to connect to the host's FTP server and send your HTML,
graphics, etc. files to it. If you have a shell/SLIP/PPP account, the
values that you provide here are the same ones that you use to connect
to your service provider. Note that not all FTP servers require a password
or account, so check with your service provider if you have questions.
- Host name: The host name, as in "server1.netcom.com".
- User ID: Your name, as in "jjones".
- Password: Your password (if any), as in "secret".
- Account: Your account (if any), as in "group32".
- Wait timeout: The maximum number of seconds to wait for a reply
after sending a command to the host, as in "30". If you use a low value
here, you may find that you need to adjust it periodically depending on
server traffic, etc., so we recommend a minimum value of 30 seconds. The
intent of this field is to allow you to determine your patience level
rather than having us do it for you, since servers sometimes don't
respond for 5 minutes or more if they're having a bad day.
Telnet
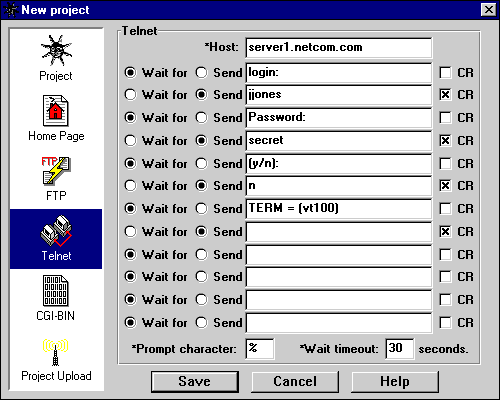
This section lets you configure the internet Telnet settings
which Alchemy will use to upload your projects to your web server
(a.k.a. your host) and to automatically connect to a host
for a terminal emulator session. When you start a new project, these
settings are copied into the new project file from the
default settings. When you select the
Project/Upload project to server... menu item or press
the Upload toolbar button in the Project window, Alchemy
uses the project-specific settings to connect to the host's Telnet
port and change the access permissions on your directories and HTML,
graphics, (etc.) files if you have specified that Telnet be used to
set the access permissions. When you select the Host/Connect
menu item or press the Connect toolbar button in the Telnet
Session window, Alchemy uses the project-specific settings to
automatically connect to the host's Telnet port. What you are
essentially doing here is creating a log-in script. If you have a
shell/SLIP/PPP account, the values that you provide here are exactly
the same as those that you use to connect to your service provider.
If you are using Trumpet Winsock (or something similar) you should
pull these values out of your current log-in script.
- Host: The host name, as in "server1.netcom.com".
- Wait for: Wait for the host to send us this text before continuing.
- Send: Send this text to the host.
- CR: Append a carriage return to the text when sending it to the host.
- Prompt character: This is the last character of the command prompt
which is used by your host. Alchemy uses this while setting file access
permissions to determine that the host is ready to accept a command. To find
out what this character is, start a Telnet session with your host and look at
the last character of the command prompt. Note: If you use Telnet to
set file permissions when uploading your project to the host and do not specify
the correct value for this field, your upload will fail with a timeout error.
- Wait timeout: The maximum number of seconds to wait for a reply
after sending a command to the host, as in "30". If you use a low value
here, you may find that you need to adjust it periodically depending on
server traffic, etc., so we recommend a minimum value of 30 seconds. The
intent of this field is to allow you to determine your patience level
rather than having us do it for you, since servers sometimes don't respond
for 5 minutes or more if they're having a bad day.
This may sound kind of complicated, but it's really a piece of cake. For
example, a typical setup might look like this:
CGI-BIN
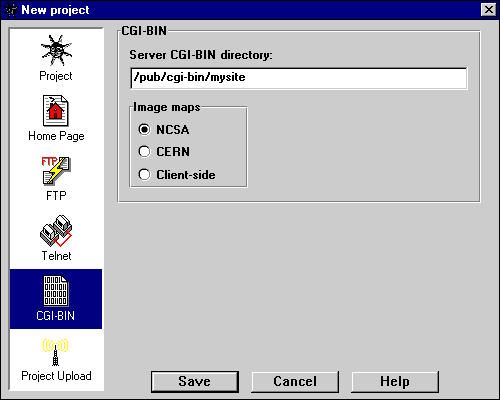
This section lets you specify the location of your web server's CGI-BIN
directory (if any) and the type of web server you are using.
- Web server CGI-BIN directory: The host directory in which your
CGI-BIN files are stored, as in "/pub/cgi-bin/myco".
- Image maps: The type of image maps you'll be using in this project.
The Alchemy Image Map Editor can create server-side image map files for NCSA-
and CERN-style servers as well as client-side image maps. The image map type
that you specify here is used by the Alchemy Image Map Editor as the default
when creating new image maps, but you can still create image maps in any of the
formats that are supported by the editor.
Project upload
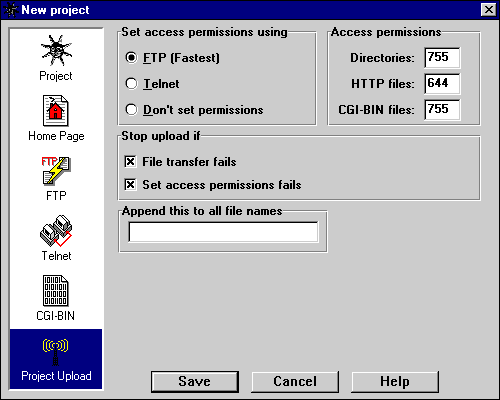
This section lets you specify the way in which Alchemy will handle your
project files when uploading them to the web server. When you start a new project,
these settings will be copied into the new project from the
default settings.
Traditionally, there are three steps involved in storing documents on a web server
so that they can be accessed by a web browser. First, you must create the directories
in which the files will be stored. Second, you must copy the files to the server.
Third, you must set the Unix access permissions for each of the directories and
files so that they can be accessed by the web server and sent to a web browser.
Alchemy will take care of all of these items for you automatically, but you need
to tell it how you want your files to be processed.
Set access permissions using:
- FTP: - Set permissions using the FTP SITE command, as in
"SITE chmod 644 index.htm". This is the preferred method, as it is faster and
more reliable than Telnet. If your FTP server supports the SITE command, you
should use this method.
- Telnet: - Set permissions using Telnet. After all files have been
uploading using FTP, Alchemy will establish a Telnet session with the host and
set access permissions from the command prompt. This method is slower and not
as reliable as FTP, but you will have to use it if your FTP server does not
support the SITE command.
- Don't set permissions: - Alchemy will not attempt to set access
permissions if this option is selected.
Access permissions:
These items are used to set the default access permissions for directories, HTTP and CGI-BIN
files. Note that you can also set the access permission for individual directories and
files by right-clicking the mouse in the Project Window and selecting
Properties... from the speed menu.
- Directories: - This value will be used as the access permission for any
directories which are created by Alchemy (i.e., the
home directory or
CGI-BIN directory).
- HTTP files: - This value will be used as the access permission for all
files which are uploaded to the home directory.
- CGI-BIN files: - This value will be used as the default access permission for all
files which are uploaded to the CGI-BIN directory.
Stop upload if:
- File transfer fails: - Check this box if you want the project upload halted when
an FTP STOR command fails; this will allow you to fix the error and try again. If
this box is not checked and Alchemy is unable to transfer a file to your web server, it will
log the error and continue with the next file in the project.
- Set access permissions fails: - Check this box if you want the project upload halted
when a chmod command fails; this will allow you to fix the error and try again. If
this box is not checked and Alchemy is unable to set access permissions for a file or directory,
it will log the error and continue with the next file in the project.
Append this to all file names:
- Some service providers require that you append a special identifier to the name of each file
that you upload to their server (your user ID and password, for example). Alchemy uses the
information in this field to append the identifier automatically during project uploads. For
example, if you enter ".jjones.secret" in this field and upload the file "myfile.gif", Alchemy
will create the file "myfile.gif.jjones.secret" on the server.
*Note: how to tell if your FTP server supports the SITE command
There are several ways to determine whether or not you can set access permissions using
FTP.
- Ask your service provider
- Try it - Establish a command-line FTP session with your server and issue
the SITE command. If you get the message "Command not implemented." or something
similar, then your FTP server does not support the SITE command.
- Check the Messages Window - The first time you upload your project using
Alchemy, set the Set access permissions using: value
to FTP. If the upload fails with the message "Command not implemented." or
something similar, then your FTP server does not support the SITE command.
 A Next Wave communication. © Copyright 1996
Next Wave Software.
All rights reserved. Feedback to
feedback@stormsurge.com.
A Next Wave communication. © Copyright 1996
Next Wave Software.
All rights reserved. Feedback to
feedback@stormsurge.com.